2013 Retrochallenge Winter Warmup, Retrochallenge

2013 Retrochallenge Winter Warmup – Post 05

Testing (Part 2)

(This is part five of the chronicle of my 2013 Retrochallenge Winter Warmup submission. The mediocrity starts here.)

Having modified the initial design and successfully recorded a program from the Apple IIe to the iPhone, the next step was to wipe the Apple IIe clean and load the program back into memory. So I…

  • booted the Apple IIe to the BASIC prompt
  • connected the cable between the iPhone and IIe
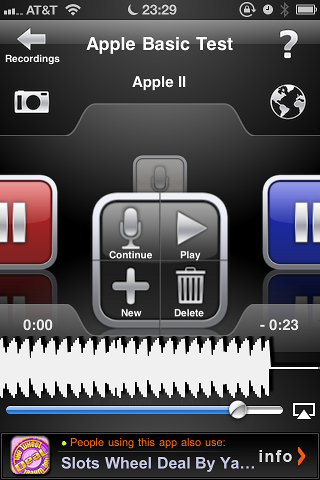
  • launched the Voice Memo app on the iPhone (with the recording made earlier)
  • type “LOAD” at the BASIC prompt
  • pressed “PLAY” in the Voice Memo app
  • waited for BASIC to return to the prompt, and…

Nothing.

It never returned to the BASIC prompt. It would still be waiting if I let it.

So, Snag #2

I thought…”obviously a volume level problem”. But I tried every possible volume level available on the iPhone and…

Nothing.

I thought…”maybe the audio out cable is not working”. So I connected the iPhone to the AUX input for my car’s audio system, turned on the stereo, and…

The mind-numbing 770 Hz tones and warbles were being played as originally expected.

I thought…”So maybe the waves are being chopped at the peaks and valleys during recording or playback”. The Voice Memo app doesn’t provide any options for recording level, etc. Maybe I should try a 3rd party app. So I downloaded a handful of free apps:  SpeakEasy, Voice Record HD, iTalk. There were many others I didn’t try. Most offer some way of posting recordings to cloud services or ftp servers. That might be pretty cool.

Some Success

Eventually I discovered that the recordings made with the Apple Voice Memo could be successfully loaded if played from an email attachment. But not from the app itself. I know. Makes no sense at all.

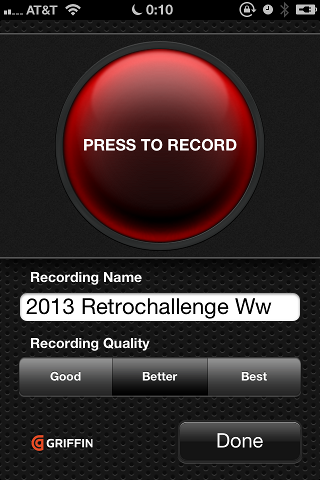
The SpeakEasy app didn’t provide much in the way of options, but it was the first to be able to successfully save and load a simple BASIC program. So it holds a special place in my heart. But I found its interface to be somewhat contrived. Its four main icons rotate on a turntable and I found myself constantly hitting the “record” function when I thought it might be the “play” function. Oh…red vs blue. Yeah, thanks. Also there was one screen that I swear had no obvious way of exiting.

Screenshot of SpeakEasy app

Voice Record HD wins points for style. It was also able to successfully save and load a program from the Applesoft BASIC interface. Some of the features such as interfacing with DropBox and Google Drive are promising, but it looked like, while you can assign a title to a recording, the filename for the audio file consists of nothing more than a timestamp with an .mp4 extension. That would cause confusion later if the file were transferred to another system.

For example, notice below the title is “retrochallenge”, but the filename is “20130123-215432.mp4”. Oh, snap! calls to Guatemala for 12 cents per minute. Awesome. Maybe I should re-enable targeted ads in my preferences.

Screenshot of Voice Record HD

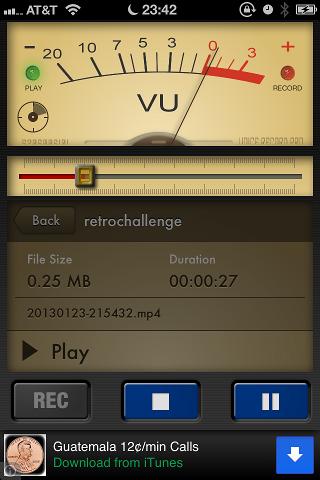
The iTalk app had the simplest interface of the three and no mistaking what you press for “record”. It was able to successfully save and load the test program (with the output volume set around 90% during playback). The paid version integrates with DropBox and includes sharing via email (though email may be in the free version; I’ve upgraded since these snapshots were made).

iTalk record screen
iTalk playback screen
iTalk recording attributes

So. Yea! Some success.

Advertisement
2013 Retrochallenge Winter Warmup, Retrochallenge

2013 Retrochallenge Winter Warmup – Post 04

Testing

(This is part four of the chronicle of my 2013 Retrochallenge Winter Warmup submission. The mediocrity starts here.)

Immediately upon completing the cable, I quickly:

  • booted the Apple IIe to the BASIC prompt
  • connected the cable between the iPhone and IIe
  • wrote a few lines of REM statements
  • launched the Voice Memo app on the iPhone
  • pressed “Record” in the app
  • typed “SAVE” from BASIC
  • waited for the BASIC prompt to come back
  • pressed “Stop” in the app
  • unplugged the iPhone
  • listened to what was recorded and…

Snag #1

All I could hear in the recording was myself typing on the IIe and rustling about in my nylon jacket. So obviously the iPhone was using its internal microphone instead of the line-in. After verifying all the connections were valid along the cable and behind the IIe, I decided to pray to the Internet.

The Internet told me that the iPhone expects a particular amount of impedance on the microphone pin before it will be recognized. Otherwise the iPhone will default to using the built-in microphone. About 1600 ohms is needed.

So without knowing what that really meant I decided to add two resistors I found in my junk pile, a 1k and 620 ohm in series along the line and things are back on track.

I am now able to record to the iPhone.

You may wish to turn down your computer’s speaker volume before clicking on this link. There will be 10 seconds of mind-numbing tone followed by another long run of “was-once-my-mind-but-is-now-jelly”-numbing tone before the data part starts to warble out.

Apple II Cassette Audio Test (recorded using the cable above and the Apple iPhone Voice Memo app)

But then, as it is with computers, I hit Snag #2…

2013 Retrochallenge Winter Warmup, Retrochallenge

2013 Retrochallenge Winter Warmup – Post 03

Construction

(This is part three of the chronicle of my 2013 Retrochallenge Winter Warmup submission. The mediocrity starts here.)

1. iPhone plug (TRRS 4-pole connector)

  • Strip 1/8″ (3mm) off both ends of the 4 wires
  • Use a digital multimeter to determine the relationship between the plug and posts (where wires will be connected/soldered)
  • Solder 1 wire to left channel (tip)
  • Skip the right channel (next closest to tip)
  • Solder 2 wires to ground (next closest to base)
  • Solder 1 wire to mic (base)
  • Test connections using digital multimeter (ensure each wire connects to exactly one part of the plug)
  • Slide the clear insulator sheath over the solders (to prevent accidental connections to the metal housing)
  • Slide the housing over the wires and screw the housing onto the plug
  • Test again using digital multimeter to ensure the housing isn’t interfering with the connections

2. Braid Wires

To avoid the 4 wires from becoming unwieldy I wanted some way to bundle the wires together. I thought about purchasing a length of heat shrink tubing but decided it would be simpler to braid or weave them together. I tried searching how to braid 4 strings but could only find references to friendship bracelets. Now that might be pretty cool to weave some retro logos using the wires but life is short. So I decided to do a 3-string braid – treating two of the wires as a single.

For some fleeting moments I had a good rhythm for the braid – until I thought about it. So some sections look like I knew what I was doing and other sections look like I was drunk. Braiding 4 wires (well really 3)

3. Microphone plug

  • Solder the mic wire to the tip
  • Solder one of the ground wires to the base

4. Line out plug

  • Solder the left channel wire to the tip
  • Solder the remaining ground wires to the base
Here is the (almost) completed cable. In my over-zealousness to try the cable out, I didn’t take a picture of it in its simple state before I found my initial design was flawed and needed additional surgery.

2013 Retrochallenge Winter Warmup, Retrochallenge

2013 Retrochallenge Winter Warmup – Post 02

Collecting Components

(This is part two of the chronicle of my 2013 Retrochallenge Winter Warmup submission. The mediocrity starts here.)

Before I can assemble the cable for the Retrochallenge, I have to find the components. One end of the cable needs to plug into the iPhone and the other end needs to split into 2 mono plugs. The mono plugs are easily available at most electronics parts stores (Radio Shack, Fry’s, etc). However, the iPhone uses a 4-pole phone plug to handle the stereo earplugs, headset microphone, and remote switch.  Because the Internet is teeming with prattle about the iPhone, I found searching for this part quite difficult.

That was until I discovered the magic phrase “TRRS”. Then it became easy. I found on Ebay I could get a package of 5 shipped from China to my doorstep for $4US. And it must’ve taken the speed boat because it arrived in a little more than a week after ordering.

For wiring, I already had a spool of 26 gauge stranded wire – all black, so I’ll have to use the multimeter often to keep things straight. I thought about using, say, some CAT-5 cabling or getting some heat-shrink tubing to help bundle the wires. However I think it would have more panache if I weaved them together.

Components needed for iPhone / Apple II cassette interface cable

Tools

Nothing special regarding tools. It is nice to have wire strippers with the numbered grooves. So stripping the 26 Gauge wire will be quick and error-free. I think of the time lost to stripping wires using an X-acto knife or crappy strippers and I begin to weep. Also in a big step towards a crap-free existence, I received a much better soldering iron as a birthday gift from my wife. This will be my second opportunity to use it so I hope I don’t muck up the tip.

Not pictured but vital is a digital multimeter so I can test my solders and keep track of which wire is connected to which part of the TRRS plug.

Tools

2013 Retrochallenge Winter Warmup, Retrochallenge

2013 Retrochallenge Competition Winter Warmup – Initial Post

For the 2013 Retrochallenge Competition (Winter Warm-up), my modest submission is  to create an iPhone to Apple II Cassette Interface Cable. This will allow an Apple II user to save and load programs from Applesoft BASIC to an iPhone as digital audio using, say, the Voice Memo app.

Once in the Voice Memo application:

  • The digital audio files can be named/renamed to better describe the program/data.
  • Programs/data can be backed-up in the iTunes database and I assume iCloud, too.
  • Programs/data can be shared with others using SMS or Email directly from the app.
A possible improvement to the design would be to insert a switch along the wire which can remotely control the start/stop recording function of the Voice Memo app – maybe in the Summer. Definitely not over-achieving here.
Design sketch for iPhone to Apple II Cassette Interface Cable
Initial Design