This is part three of my Retrochallenge 2016/10 journal, where I’m working towards loading ROM images to an Intellivision from an Atari 800. To jump to the very beginning, click here.

My First Serial Transmission From Atari & Action!
Before attempting to send data to the Intellicart! cartridge emulator on the Intellivision, I wanted to be sure I can send data correctly from the Atari 800 and its 850 interface module.
For this, I wrote a quick and dirty Action! script on the Atari 800 to open a small text file as input and configure/open a serial connection for output. The Atari 800 reads bytes from a text file stored on a floppy and sends the bytes to the serial connection provided by the Atari 850 interface module. On the other end of the serial connection is a serial to USB adapter and my laptop running minicom, which is listening to /dev/ttyUSB0 and capturing any input. The serial cable I am using is a normal null-modem serial cable, not a normal null-modem cable. Correction: I am using a null-modem cable.
Using my laptop to receive the data provides a way for me to observe what exactly is arriving via the RS232 connection. The Intellicart! will provide little diagnostic feedback.
Lessons Learned:
- When working with a serial connection, ensure the serial cable is connected.
- When working with minicom, modify its configuration–>screen & keyboard setting to display hex. This avoids any confusion caused by characters being interpreted as control codes such as vertical tabs, backspaces, etc.
Configuring the Atari 850 Interface Module
For setting the baud rate, parity, stop bits, and the other RS232 settings on the Atari 850 interface module, the Action! language provides the XIO command which is similar to the XIO command found in Atari BASIC. The XIO command is a way to talk to devices via its driver software.
The general format of the XIO command in Action! is:
XIO(IOCB, 0, cmd, AUX1, AUX2, "Rn:")
- where IOCB is be a number between 0-7 (maybe just 1-5 in this case)
The I/O Control Block number (IOCB#) specifies which channel a program is assigning to some interaction with a device. Normally, this can be a number between 0 and 7, however when using Action! channels 6 and 7 are already assigned to the editor (E:) and screen (S:) devices. Your program would allocate a channel to a device/file, perform some operation (read, write, get status, etc), then close the channel when finished.
- and where the zero is required
- and where cmd can be:
| cmd | Description |
| 36 | Set baud rate, word size, stop bits, and ready monitoring |
| 38 | Set translation mode and parity |
| 34 | Set outgoing lines DTR, RTS, and XMT |
- and where AUX1 and AUX2 are normally bit fields containing flags for different options.
For example, with XIO command 36, bits 0 through 3 define baud rate. The 850 technical manual contains tables with the available options (15 is supposed to be 19200).

Sample table from Atari 850 Technical Manual
- and, finally, where “Rn:” specifies which of the four RS232C ports on the Atari 850 is being configured.
n can be a value between 1 and 4. “R:” is the same as “R1:”. One thing to keep in mind is that not all 4 serial ports on the 850 have exact same pin-outs. R1 is normal enough for our use.
Code
Here is the Action! code that runs on the Atari to send a small packet of bytes at 9600 8N1 to serial port 1 (R1:) on the Atari 850.
;------------------------------------
PROC HOME()
  PUT(125); Clear screen
RETURN

;------------------------------------
PROC INIT_R1(BYTE IOCB)
  BYTE AUX1
  BYTE AUX2

  AUX1=14+0+0 ; 9600,8 bit word,1 stop bit
  AUX2=0  ; no ready checks
  XIO(IOCB,0,36,AUX1,AUX2,"R1:")

  AUX1=32+0+0;No translation nor parity
  AUX2=0
  XIO(IOCB,0,38,AUX1,AUX2,"R1:")

  AUX1=128+32 ;DTR off,RTS off
  AUX2=0
  XIO(IOCB,0,34,AUX1,AUX2,"R1:")
RETURN

;------------------------------------
PROC MAIN()
  BYTE CH
  BYTE INP,OUT
  HOME()

  INP=1 ; IOCB #1
  OUT=5 ; IOCB #5
  OPEN(INP,"D2:TEST.TXT",4,0)
  OPEN(OUT,"R1:",8,0)
  INIT_R1(OUT)

  CH=GETD(INP) ; READ CHAR FROM TXT FILE
  WHILE CH
  DO
    PUT(CH)      ;PRINT TO SCREEN
    PUTD(OUT,CH) ;WRITE TO R1:
    CH=GETD(INP)
  OD

  CLOSE(OUT)
  CLOSE(INP)
RETURN
Some notes:
- INIT_R1 calls XIO to configure the RS232 port’s baud rate, etc.
- D2:TEST.TXT contains the text:
ABCDEFGH
01234567
Results
Here is minicom running on my laptop set to listen to /dev/ttyUSB0 at 9600 8N1. The minicom screen/keyboard setting has been configured to display data received in hex format. The bytes received match the bytes that were sent (“A” = 0x41, “B” = 0x42, …). 0x9B is Atari’s EOL character.
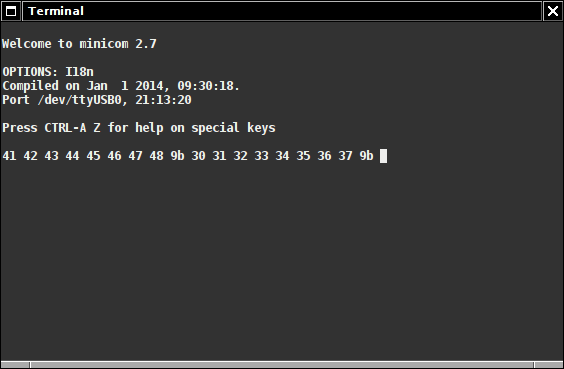
I’m thrilled!
Up Next
Learn a little more about the data transfer protocol expected by the Intellicart!
